Ewell Hall uses the Hallmaster Online Booking System. This brief guide will show you how to make the most of it as a Ewell Hall customer.
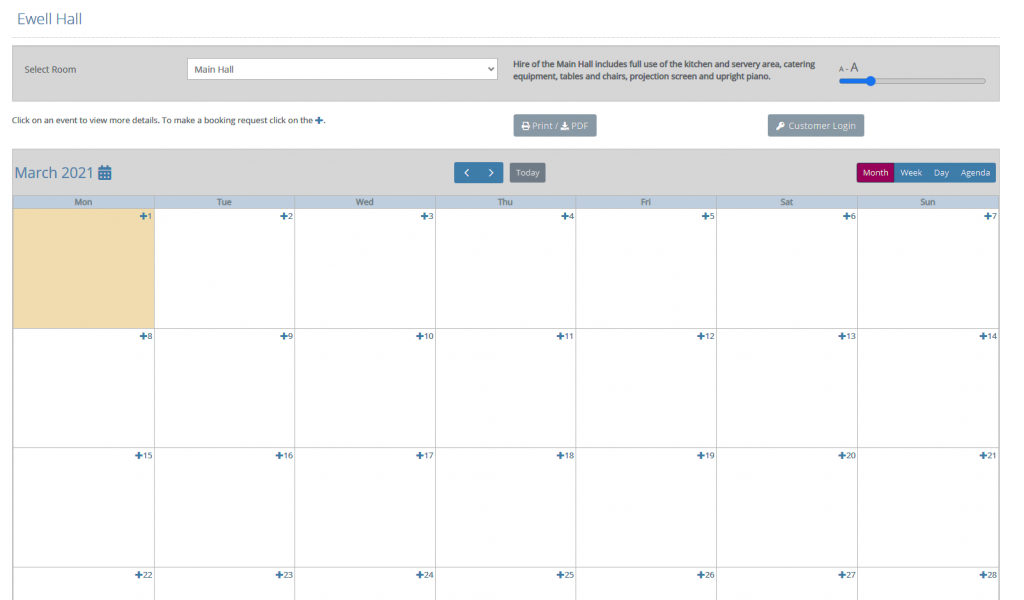
You are able to make an online booking request from the Hall Calendar page by clicking on the + symbol next to the date you wish to book. If you are making a booking request for the first time, you will be asked to enter your contact details and a password so that you can track your booking status, and view any invoices and payments linked to that booking, much in the same way you would with an online shopping website.
Note: If you do not see the + symbol next to the date of your choice then, either all booking slots have already been taken for that day, or exceptionally, online booking has been disabled for that day. Please choose another date or contact Nick McInnes, the Ewell Hall Manager, on 020 8614 0714, or email info@ewellhall.uk, for more information.
An example of a blank Ewell Hall Calendar or Scheduler page is shown below
Once you have clicked on the + symbol, you will need to complete the rest of the booking request form on the Hallmaster site as follows:
Name: This is your name for the event you are booking, e.g. Fred’s 60th Celebration, St Mary’s Children’s Hour, Sue’s Party, etc.
Start Date/Time: The start date and time of the event. If this is a recurring booking, this is the start date and time of the first event in the series.
End Date/Time: The end date and time of the event. If this is a recurring booking, this is the end date and time of the first event in the series. Please remember that overnight bookings are not allowed.
| TOOL TIPS On any page in the Hallmaster booking system, look out for the ? mark icon, hover over this icon to see more information about the particular field or section it relates to. |
Recurring Booking: If this is a recurring booking for multiple dates, tick this box and choose the booking frequency (eg Daily, Weekly etc), along with how many additional dates you want to add to this series. Individual dates in a series can be amended to a different date or time.
Make sure to click on the green Check Availability button. If there is a clash of bookings at any date or time a red error message will display saying ‘The dates of this booking clash with other dates in the calendar, or they don’t end after they begin’. You can then check the scheduler at the top of the screen to see where the clash is and amend the booking accordingly. Note: You cannot proceed with creating a booking request where there is a clash.
Activity: This is the general ‘type’ of booking you are making. Choose from the options Ewell Hall has setup to indicate what kind of booking this is. If you are unsure what to choose here, contact the Ewell Hall Manager.
Description: You can put as much or as little information about the event itself, including prices, what to bring and links to websites etc. that you want your guests and others to see. Please see item on privacy below.
Privacy: There are 3 privacy settings for bookings:
| 1. Private: Please select this choice – Private – only when choices 2 or 3 are unsuitable for your event The Scheduler will only show the time the event is booked for and whether the booking is Requested or Confirmed. The booking will display as ‘Private Event’ and not show your Event Name, description or your contact details. |
| 2. Public – Contact Details Hidden This is the recommended choice for all events that are not open to the public, e.g. for business or family events. The Scheduler will show the Event Name and a link to the description but will hide your contact details (eg name, email address, telephone number etc), once the booking has been accepted by the Ewell Hall Manager. If the event is still to be accepted, the calendar will continue to display as ‘Provisional Booking’ |
| 3. Public This is recommended choice for events that are either open to the public or events that would welcome contact from prospective participants, e.g. activity classes, club or group meetings. The Scheduler will show the Event Name and a link to the description and your contact details, once the booking has been accepted by the Ewell Hall Manager. If the event is still to be accepted, the calendar will continue to display as ‘Provisional Booking’. |
Number of People Attending: Here you are asked to indicate how many people are expected to attend your event.
Special Requirements: This can be a list of any specific requirements such as Use of Sound System.
Terms & Conditions: Proceeding to the stage of a confirmed booking means that you accept the terms and conditions for using Ewell Hall that are included on the website.
Save Booking: Once completed press Save and the request will automatically be sent to the Ewell Hall Manager for processing, you will also receive an email from Hallmaster confirming that the request has been sent – this is not confirmation of your booking. You will then be taken to your Hallmaster dashboard to log out (in top right hand corner) or to view your bookings and invoices.
Additional Bookings: You can always make other booking requests at any time from the Ewell Hall Scheduler or by using the Request Booking button in the Bookings page of your Hallmaster Dashboard.
View your Bookings, Invoice and Payments: Once logged in to your own Hallmaster account, you will see a list of your bookings and check their dates, times and status, and any invoices that are due for payment. Please note that payment of any invoice must be made in full within 7 days of issue in order for your booking to be confirmed by the Ewell Hall Manager.
Download and Print Invoices: To view, download and print an invoice from your control panel, go to the Invoicing page or click on the blue Invoicing icon on the far right of the bookings in the Bookings page. You will receive a copy of your invoices by email from the Ewell Hall Manager.
View Payment History: When looking at your invoices click on the blue Shopping Cart icon to see a list of payments against each invoice.