The refurbished Ewell Hall Sound System is available to Hirers if pre-booked with the Ewell Hall Manager. The Sound System is designed to enable background music and voice reinforcement for events in the hall. The sound output level is probably not adequate for adult discos or similar events.
The Sound System is built into a wall mounted rack in the hall table storage area. Please let the Ewell Hall Manager know in advance if you intend to use the Sound System. A code to open the rack door will then be issued.
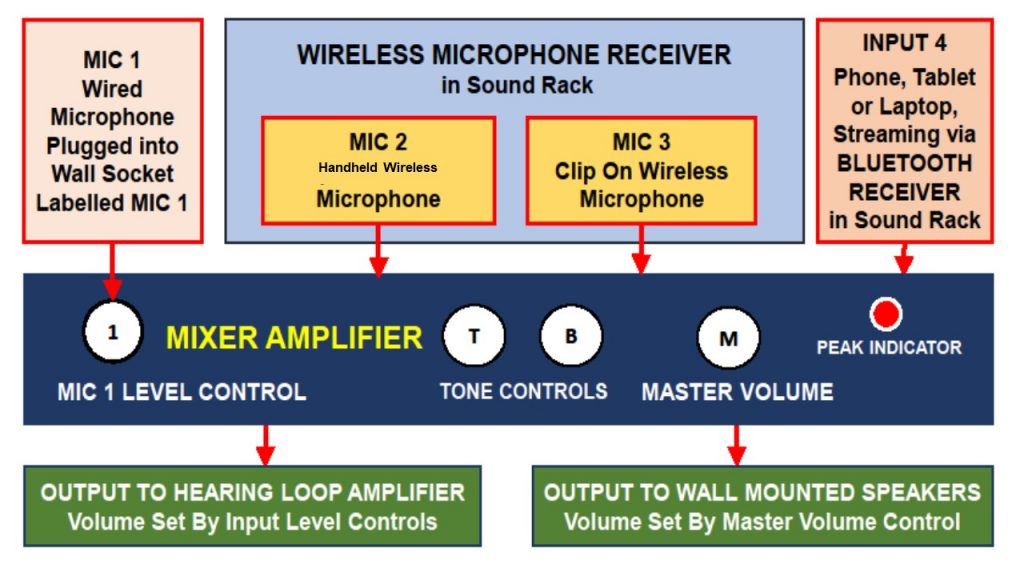
The Sound System offers the following inputs which may be used singularly, together, or in any combination as shown in the schematic diagram above:
| MIC 1 | A plug-in Wired Microphone that may be used handheld or on a microphone stand |
| MIC 2 | A handheld Wireless Microphone that may be used handheld or on a microphone stand |
| MIC 3 | A clip-on Wireless Microphone |
| INPUT 4 | A Bluetooth Receiver which gives the ability to stream background music or other content from your phone, tablet, laptop or other device with a Bluetooth connection |
Inputs are fed to the Mixer Amplifier which has a knob that controls the level of the Wired Microphone MIC 1, treble and bass knobs, and a Master Volume knob. The levels of MIC 2 and MIC 3 are controlled on the front of the Wireless Microphone Receiver, and INPUT 4 from the front of the Bluetooth Receiver. Sound output from all inputs is mixed, amplified, and fed to a pair of wall mounted speakers – however the system operates in mono not stereo.
An induction hearing aid loop is installed around Ewell Hall. The loop is automatically activated when the Sound System is turned on and any input is in use. The hearing loop remains active even if the output to the speakers is turned to zero with the Master Volume knob.
The Sound System is made available to Hirers only on the understanding that Ewell Hall are unable to guarantee that the Sound System will be fully operational or available for any booking. Hirer’s must also agree that Ewell Hall will not be liable for any consequential loss or damage due to any failure to provide a working sound system.
Hirers are responsible for ensuring the safe use of the Sound System and for the safety of all those in the hall. Hirers are also responsible for the cost of any damage or loss to the Sound System during their hire. Any faults must be reported to the Ewell Hall Manager, preferably as soon as the problem is encountered.
To get started open the sound rack glass door by entering your code and turning the lock handle a quarter of a turn anticlockwise. Please ensure that no one walks into the open glass door. Keep the glass door closed when not in use.
SOUND SYSTEM STEP-BT-STEP OPERATING INSTRUCTIONS
- Turning on the Sound System:
- Start with all volume knobs set to zero and then turn on the Master Power Switch at the bottom of the sound rack. The red indicator next to the switch shows when the system is powered up. There is also a red power indicator next to the hearing loop amplifier which is mounted on the wall in the nearest corner of the hall.
- If you intend to use them turn on the Wireless Microphone Receiver and/or the Bluetooth Receiver.
- Turn on the ON/OFF rocker switch on the front of the Mixer Amplifier.
- To use the Wired Microphone – MIC 1:
- Open the Microphone Storage Cupboard near the bottom of the rack.
Please be careful not to let the glass door close whilst the cupboard door is open. - Take out the Wired Microphone – it is marked MIC 1 – and one or two microphone cables. Two cables may be joined if extra length is needed to reach the desired location.
- Position the microphone, using a microphone stand as necessary. A table mic stand and a floor standing mic stand are kept in the cleaning equipment store.
- Plug the female end of the microphone cable into the base of the microphone and the male end of the cable into the microphone socket – also marked MIC 1 – on the white trunking on the hall wall.
- Open the Microphone Storage Cupboard near the bottom of the rack.
- To use the Handheld Wireless Microphone – MIC 2:
- Open the Microphone Storage Cupboard near the bottom of the rack.
Please be careful not to let the glass door close whilst the cupboard door is open. - Take out the Handheld Wireless Microphone MIC 2 and check that it has an AA battery installed. We aim to provide a spare battery in the storage drawer. However, it would be wise to bring your own spare AA batteries.
- Slide the switch on microphone to the ON position. If the light next to the switch does not illuminate the AA battery probably needs replacing. To conserve the battery, keep microphone switched OFF when not in use.
- Open the Microphone Storage Cupboard near the bottom of the rack.
- To use the Clip On Wireless Microphone – MIC 3:
- Open the Microphone Storage Cupboard near the bottom of the rack.
Please be careful not to let the glass door close whilst the cupboard door is open. - Take out the Wireless Microphone Transmitter MIC 3 and check that it has an AA battery installed. We aim to provide a spare battery in the storage drawer. However, it would be wise to bring your own spare AA batteries.
- Take out the clip-on microphone and plug it into the top of the Wireless Microphone Transmitter.
- Slide the switch on the top of the Transmitter to the ON position. If the light next to the switch does not illuminate the battery probably needs replacing. Remember to keep microphone switched OFF when not in use.
- Open the Microphone Storage Cupboard near the bottom of the rack.
- Pairing and Unpairing your Bluetooth Device – INPUT 4:
- Once the Bluetooth Receiver has been turned on the green Status Light will flash slowly.
- Briefly press the Bluetooth Receiver’s Pair Button. The Status Light will start flashing quickly.
- On your Bluetooth device enter your device’s Bluetooth settings menu and select DN-300BR.
- When the Bluetooth Receiver successfully pairs to a Bluetooth device the Status Light will be on steadily.
- Some older Bluetooth devices may require you to enter a PIN. If this is the case enter 0000 as the PIN.
- If no device pairs within 60 seconds the Bluetooth Receiver will exit pairing mode. Try moving your Bluetooth device nearer to the Bluetooth Receiver and briefly press the Pair Button again.
- Once your Bluetooth device is paired you are ready to start playing the audio on your device.
- When finished, to unpair your device, either enter your Bluetooth device’s settings menu and disconnect from DN-300BR, or press and hold the Receiver’s Pair Button for 3 seconds and then release it. The Receiver will unpair from your device, remove it from its memory, and be available to pair to another device.
- Using the Mixer Amplifier:
- Set the master volume knob to a level between 8 and 9. Leaving any unused volume knobs at zero, adjust the MIC 1 volume knob on the Mixer Amplifier, the MIC 2 and MIC 3 volume knobs on the Wireless Microphone Receiver, and the INPUT 4 volume knob on the Bluetooth Receiver, as necessary to give the required output.
- If the Amplifier ‘peak’ indicator illuminates turn down input volumes until it no longer flashes or illuminates.
- Once the system has been set up the final volume to the speakers may be controlled with the Master Volume knob. The Amplifier will give best performance with the Master Volume set between 8 and 9.
TO TURN OFF THE SOUND SYSTEM
- Turn all the volume knobs for MIC 1, MIC 2, MIC 3 and INPUT 4, and the Master Volume knob, to zero.
- Unplug and put away the Wired Microphone, microphone cables and any microphone stands.
- Turn off and put away the Wireless Microphone Transmitters and the Wireless Microphones.
- Switch off the Wireless Microphone Receiver, the Bluetooth Receiver, and the Mixer Amplifier.
- Turn off the Master Power Switch at the bottom of the rack, then close and lock the Sound System rack door.
Thank you for following these instructions.
22 February 2021